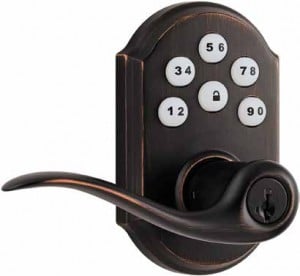
In our industry we deal with technology constantly. So, sometimes it’s hard to get excited about a lockset. Big deal, right? But with keyless entry, user-changeable rekeying (for when you do need a key), advanced automation and communication features, the Kwikset SmartCode electronic lever (912TNL TRL ZW 15 SMT) and SmartCode electronic deadbolt (914TRL ZW 15 UL) are locking devices to get excited about. And they’re fun to play with, too! Kwikset is a familiar brand to most people when it comes to traditional residential locks. The company has been manufacturing residential and light-industrial locking devices for more than 60 years. At one point or another, most, if not all of us, have operated a Kwikset doorknob, lever or deadbolt to enter a home or office. And in recent years the manufacturer has also offered electronic locks that no longer required us to carry a traditional key.
Construction
The SmartCode lever is recommended for single cored doors; a double cored door would require an additional deadbolt to cover the top bore. It fits standard thickness doors (13⁄8 to 21⁄8 inch) with no screw holes needed and is available in three finishes including polished brass, venetian bronze (dark) and the one we tested, satin nickel. The SmartCode electronic deadbolt 914 is very similar to the SmartCode lever and provides the added security of a deadbolt lock in a more robust metal housing that appears to be heavy duty. The deadbolt will fit either a 11⁄2- or 21⁄8-inch cutout and comes with an adaptor ring for use in the latter. As with the SmartCode lever, either a 23⁄8- or 23⁄4-inch backset is acceptable, and the kit includes an adjustable deadbolt and optional drive-in deadbolt. Both feature the SmartKey cylinder, a patented technology that allows the cylinder to be rekeyed without removing it from the lockset. This utilizes a side locking bar, with the bar, racks and pins made out of stainless steel for strength and smooth corrosion- resistant durability. The locking bar technology replaces the traditional pin tumbler design, making the cylinder both pick and bump resistant. The cylinder also incorporates steel balls inside the face of the cylinder to resist against drilling.
Features
The newest of the SmartCode electronic series is offered in a lever lock and as a deadbolt. Both offer touch-button access with the patented SmartKey rekey technology cylinder as a backup or override. What makes these different — the models reviewed are not available at traditional retailers and are meant for professional installation — is the added Z-Wave or ZigBee technologies for wireless integration into home automation systems. This allows the locks to be remotely locked/unlocked via a home automation controller, either through preset parameters such as time of day, and/or alarm conditions detected by the home system, or through the use of remote software or smartphone apps. Kwikset is working with suppliers like AMX, Control4 and Crestron to enable seamless integration of home automation and security products across a range of platforms.
When locking and unlocking with the touchpad, a motor mechanically turns the actuator and the interior thumb-turn in the handle. Locking from inside or outside is accomplished by the touch of the lock button. Use of a key locks and unlocks the lock from the outside in a traditional manner. The deadbolt features a 10-button keypad which, while recognizing personal preference may be at play here, we far prefer to the five-key version on the lever lockset.
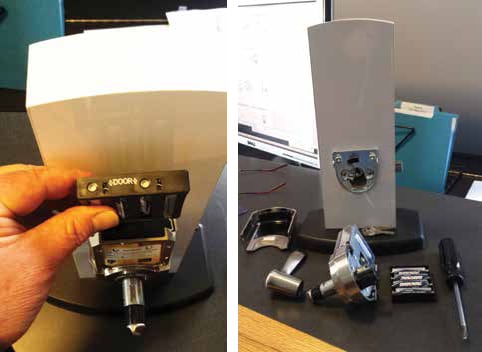
The SmartCode electronic lever’s battery pack slides in/out easily and is stamped on the top
“Door” with an arrow on either side of the stamp pointing to the side the door should be on.
This product is easy to install and program, aesthetically pleasing and solidly built.
Setup
According to the easy-to-follow Quick Installation Guide, the only tools needed for the installation, other than the 3⁄32-inch hex wrench included with the lockset, are a ruler (to measure the backset of the mounting hole in the door in order to set the adjustable latch to the right length) and a Philips screwdriver. We found that a #2 Phillips worked fine for the two screws that attached the mounting plate to the exterior keypad, but we found a #1 Phillips fit the interior assembly screws better. Not a big deal, these two sizes are the most common household-size Philips screwdrivers and can be found in most toolboxes. Typical of Kwikset and many other brands, these locksets come with an adjustable 23⁄8- to 23⁄4- inch latch, with a 1⁄2-inch throw, and feature a deadlatch to resist “shimmying” or slipping the latch back to force entry. It is easily adjusted to fit either size standard backset without the use of tools. Latch installation was simple and no different than any typical door lockset. An optional drive-in latch is available as well.
The 3⁄32-inch hex wrench (included) is used to install/remove the battery cover to access mounting screws, battery pack, the program button and to tighten/loosen the lever handle set screw. We would have preferred a more standard screw for changing the battery to prevent inconveniencing the end user if they lose the supplied hex wrench over time. The battery pack, which takes four AA alkaline batteries (not included) slides in/out easily and is stamped on the top “Door” with an arrow on either side of the stamp pointing to the side the door should be on. This makes installing the batteries almost foolproof. We also preferred the all-metal construction of the 914 deadbolt over the plastic construction used on the interior casing and battery cover of this model.
Testing
Assembly was quick, straightforward and simple. The exterior keypad and the interior mounting plate fit the 21⁄8-inch hole in the door perfectly. They were easy to hold in place while fitting the two mounting screws through the plate and into the threaded holes on the keypad. Lining the screws up was simple, as they could be seen through the large center hole in the mounting plate. You also have to feed the keypad plug over top of the latch and through an oversized hole in the mounting plate. I have found this process to be much more troublesome in other locksets requiring a cable connecting an exterior keypad. The inside handle also requires the 3⁄32-inch hex wrench to tighten/ loosen a set screw on the bottom of the collar to remove the lever. Reversing handles is simple; you just loosen the set screws on both the inside and outside handles and swap the handles.
While disassembling the demo model, which was sent to us preassembled on a display, I had both the paper installation instructions that shipped with the lockset open and an online version from the Kwikset Web site. I noticed that the online version showed the set screw for the inside handle on the side of the collar. To reverse the handle you would remove the set screw, slide the handle off and rotate it 180°, and insert the set screw into the other side of the collar away from the latching side of the door. A call to Kwikset North American Sales & Business Development Manager Larry Goldman clarified that removing the set screw was the old way to reverse the handle. At that time there was an inside handle and an outside handle that were different and not interchangeable. In an effort to simplify the installation this has been modified and now the set screw is on the bottom of the collar and is not removable — a nice feature. If you ever had a set screw fall out of this type of installation, you know it can be an annoyance to get back in the hole and the threads started. And that is if you don’t lose the screw altogether.
Also shown on the online directions, the cylinder was inserted into the lockset by the installer, then the outside handle was slid over it, but before it would all lock into place, you had to use a working key inserted in the cylinder, rotated clockwise 90° in order for the cylinder and the handle to click into place so that the set screw could then be tightened. The set screw at that time was only accessible once the key was turned and held in the 90° position. As a locksmith, I am very familiar with this type of installation of knobs and lever handles, as this is a way used to prevent the unauthorized handle removal to access the cylinder for removal and illicit entry. On the current model being reviewed, the cylinder is part of the lock mechanism from the factory and not removable, even with the handle removed. The lock would be destroyed if one tried to remove the cylinder to gain access to a locked door. For obvious reasons I didn’t break out the drill and attempt a forced entry.
While I normally would be concerned about installing a lock with a cylinder that could not be removed to rekey, the SmartKey cylinder can be rekeyed without removing it from the lockset. To achieve rekeying, you simply insert the current key into the cylinder, turn it 90° clockwise, insert the Smart- Key tool (included with the original keys) into a small slot on the face of the cylinder, remove the old key and the tool in that position, insert a new Kwikset key and rotate back counterclockwise 90° and remove the new key. The cylinder is now rekeyed. I tried this and it actually took less time to do then it did to write the explanation! Kwikset has been using this SmartKey technology for a number of years now and it is a proven time and money saver. No need to remove the lockset from the door or call a trained professional. Just have a new Kwikset key cut at the hardware store and use that for your new key or use a Kwikset key that you already use on another lock, if desired. This is a wonderful patented innovation that is exclusive to Kwikset.
The deadbolt is thrown and retracted via an internal motor. This raised some questions; while we like the potential for one-hand locking and unlocking, what would happen if the deadbolt failed to lock fully into the strike? As sometimes happens, a door may sag, warp, or otherwise cause the deadbolt not to align properly with the strike plate. This can cause difficulty in fully extending the bolt or retracting the bolt without pushing or pulling on the door. Our fear was if one were to push the locking button and walk away, the door may fail to lock without being noticed. We tested this and were pleasantly surprised at our findings. When the bolt was blocked from being fully extended into the locked position, an internal clutch slipped to prevent damage to the locking mechanism and a second attempt was automatically made. When that failed, the motor turned off and the keypad lit up red and a steady tone was emitted, warning the user that the door was not locked.
When we tested the unlocking of a stuck or bound deadbolt, a similar procedure was automatically implemented. However, instead of the keypad lighting a steady red, it lit a steady green and emitted the same warning tone indicating a bolt stuck in the locked position. We didn’t see these warning indicators clearly explained anywhere in the instructions, which we feel would be important to add in the future. We found the keypad very easy to program by following the included instructions. The lock can hold up to 30 user codes and one master code consisting of four to eight digits. The master code does not unlock the lock (unless the same code is programmed as a user code), but is used as an administrator code to add/change/delete user codes. A warning stating if the keypad is programmed with an optional master code, codes could no longer be added or deleted if the code was forgotten.
A set of four DIP switches in the programming area is used to set preferences such as the different status LED indications, beeping or silent push keys, and turning a auto relock feature on to lock the door 30 seconds after an unlock.
A nice feature is the indicator light on the interior side of the lock. This status LED indicates whether the lock is locked (blinking amber), unlocked (green), has a low battery (red), and/or was not programmed correctly.
Conclusions
Overall, we found these locks to be excellent choices for anyone looking for a keyless locking option for home or office applications. They are easy to install and program, aesthetically pleasing, and solidly built. While the electronic features are great – we all want our locks to be secure without being inconvenient — at the end of the day, it is all about securing an end user’s premises. To that end, we highly recommend these Kwikset products for people with an eye on both security and technology.
Verdict: 912 LEVER
- Features 1 2 3 4 5
- Construction 1 2 3 4 5
- Setup 1 2 3 4 5
- Performance 1 2 3 4 5
- Overall 1 2 3 4 5
Verdict: 914 DEADBOLT
- Features 1 2 3 4 5
- Construction 1 2 3 4 5
- Setup 1 2 3 4 5
- Performance 1 2 3 4 5
- Overall 1 2 3 4 5
First published in the June 2014 issue of Security Sales & Integration magazine.