There seems to be no end of small, pre-packaged camera systems available to the general public these days. People like Mr. Joe Citizen see video on social media of some lowlife making off with a package from a front porch and decides that he could use that same level of protection.
So, the next time Joe is in his favorite shopping emporium, a camera display catches his eye and he plays with the mouse on the demo system and reads the marketing info on the package and says, “I can do that!”
Well, yes and no and sometimes, maybe. Recently, we were requested to review the TV-DVR208 system from TRENDnet, the folks you probably know from their networking product line but they also offer a line of surveillance camera items.
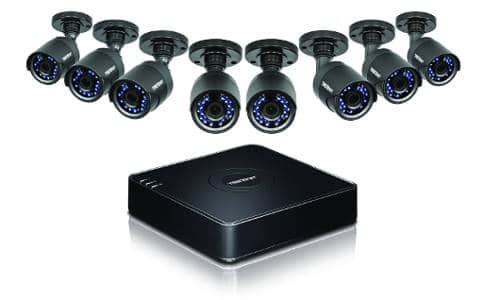
The TV-DVR208 is an analog camera system and is one of those systems-in-a-box that has everything you need to keep an eye on your property, except for a video monitor. Since this system is available on the retail market, we’re going to assume that it is intended for the likes of Joe Citizen because any mildly competent security dealer could install this unit with little difficulty.
The system arrived and was very well packaged. In the box was a DVR with a preinstalled, formatted 1TB Western Digital Purple Surveillance hard drive. Also included was a corded mouse, eight TV-A100 cameras with fixed 3.6mm lenses for a viewing angle of 82.2°.
You also get eight Siamese video/power cables (60 feet), two wall-wart style camera power supplies, a power supply for the DVR, a 78-inch HDMI cable and some documentation. Power supplies are all 100-240VAC, 50-60Hz.
Construction
The DVR is compact (approx. 8 X 8 X 2 inches) and can be installed just about anywhere small electronics can be placed, remembering that it does have a hard drive and does generate a little bit of heat. I measured one spot on the bottom of the unit’s chassis that indicated 121° F so some air flow around it is necessary.
There is a provision on the chassis to allow the unit to be wall mounted if desired. If you’re installing this system in a small business (convenience store or small office) the 60-foot cables might be sufficient for the job. If it’s going in a home, 60 feet sometimes might not be long enough for all the cameras.
There is nothing in the literature that offers additional cable assemblies in the event of a longer run so hopefully Joe knows where to turn for help and what he needs to purchase. One bit of advice: if you’re going to spend a day in the attic or ceiling installing these cables, make sure that you pull the correct cable end to the camera location because the power connectors are different from end to end.
The camera housings are attractive and unobtrusive, but I generally prefer metal housings for durability and heat dissipation. The TV-A100 cameras have dark bronze plastic housings that have an IP66 rating for outdoor use and are both CE and FCC certified. They only weigh a bit over 10 ounces each so there’s no need to torque them down severely. The locking screws on the mount don’t lend themselves to overtightening so be careful there when aiming the units.
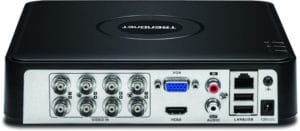
There are eight BNC camera and VGA and HDMI output ports, a network and two USB ports, two RCA jacks for Mic In/Speaker Out, power connector and chassis ground point.
Setup/Software
The documentation included is minimal; a Block Diagram, Quick Installation Guide, a note about Remote Access, a Safety Booklet and a CD containing a camera utility, and also the User Guide. My “installation” consisted of connecting all components together on a workbench in my shop.
For a monitor, I used a 24-inch, 1080p TV using the HDMI connection. I connected the system to the network and applied power. After a quick boot sequence, the Initial Setup screen appears and, following the instructions on screen, you make a few selections (password, set an Unlock Pattern and language).
Then the Setup Wizard appears for time, time zone and, if using DHCP, your assigned IP address appears. Now, the next page is where you’ll need some networking knowledge because you are going to set your ports and DNS settings.
The Quick Installation Guide merely states that, “If you don’t have or know what DNS settings are, you can click Next and skip this step.” Of course, skipping this step also skips your remote access to the system. This may be a point where Joe needs to phone a friend.
A few more simple pages and the Wizard is complete. When the Wizard screen closes, you should now be looking at your camera video. Having worked with analog cameras since the days when they all used vidicon tubes, I was really surprised at the clarity and sharpness of the video.
Right-clicking the mouse brings up menu selections and other options. There are multiple options for programming the various features that may intimidate someone new to the surveillance world but can be worked out with some perseverance and common sense.
Motion detection recording is available as opposed to continuous mode that uses more HDD storage. I set up four cameras to record continuously and the DVR calculated that I would get six days of recording on my 1TB drive with the cameras set for a resolution of 1920 X 1080 (2MP) at 12fps. Eight cameras would reduce that to three days but, obviously, motion recording would extend those times.
Testing
Assuming that during the setup of the DVR you managed to assign an IP address and configure the ports on your router, there is a free app available, TRENDnet IPVIEW, to view the DVR from a smart-phone. It is an app, and it is free, but that’s about all I can say about it. It allows the viewing of your cameras but only one at a time.
To use the 2 X 2 viewing mode, you need the upgrade app version ($3.99). To view Playback, again, you need the upgrade version. With the basic app, you can save a snapshot to your phone but local recording can only be done with the upgrade. One of my criteria for evaluating recording systems is the ease of locating recorded video. After all, if you can’t find it, what’s the point of recording it?
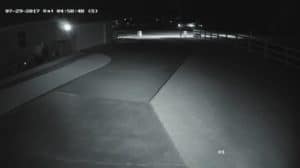
With the help of some supplemental lighting, the DVR208’s low-light coverage can be very good to about 125 feet.
On the side of the system’s packaging, there is a statement that you can “Playback from the DVR Console — No PC required.” True statement and I could save video direct from the DVR. A feature that I did appreciate in the Playback mode was the fact that you can select playback speeds of up to 128x. A very handy feature if you don’t have an approximate time when looking for a particular incident.
Using a browser-based app was a different matter, however. I could search for recorded video but couldn’t save it because of some software issue so I contacted TRENDnet’s Tech Support. After explaining my problem, the technician jumped right into the issue. After 30 minutes of gyrations, he got me to the point where the program would save the downloaded file to a folder.
Unfortunately, after hanging up I found that I could no longer view Playback video. One step sort of forward, one step back. Not willing to invest more time, I abandoned looking for a solution. The browser software could definitely stand some QC. Camera night-vision is advertised as 30 meters. Approximately 6-10 meters would be a more realistic usable distance estimate but then, I find this with most cameras in this class.
With some help, like the streetlight at the end of my 130-foot driveway, I had pretty good coverage along the entire length. Indoor video at night is pretty good for home or office use.
Conclusions
The TRENDnet TV-DVR208 records good video and plays back a quality product as did the other small video systems with which I have experience. The big difference was that with the other system, I (or Joe) didn’t really need much networking knowledge, if any, and didn’t have to do any port configuration on the router as it was done automatically by the software.
I don’t believe that the documentation accompanying this system provides the retail consumer enough information to be able to take advantage of the many features available. It needs to be informative without being overwhelmingly technical. If TRENDnet is distributing in retail chains to the general population, it would be well advised to adjust to the specific market.
The company is in the networking business so it should be fairly simple to devise and include a method of helping non-technical customers buy, install and operate a system that’s not going to disappoint. Would I install one of these in my house? Yes, and I would pop for the upgraded app if I did. But I would use it as a standalone system and skip the web browser access.
Verdict
- Features 1 2 3 4 5
- Construction 1 2 3 4 5
- Setup 1 2 3 4 5
- Performance 1 2 3 4 5
- Overall 1 2 3 4 5
First published in the October 2017 Security Sales & Integration magazine.